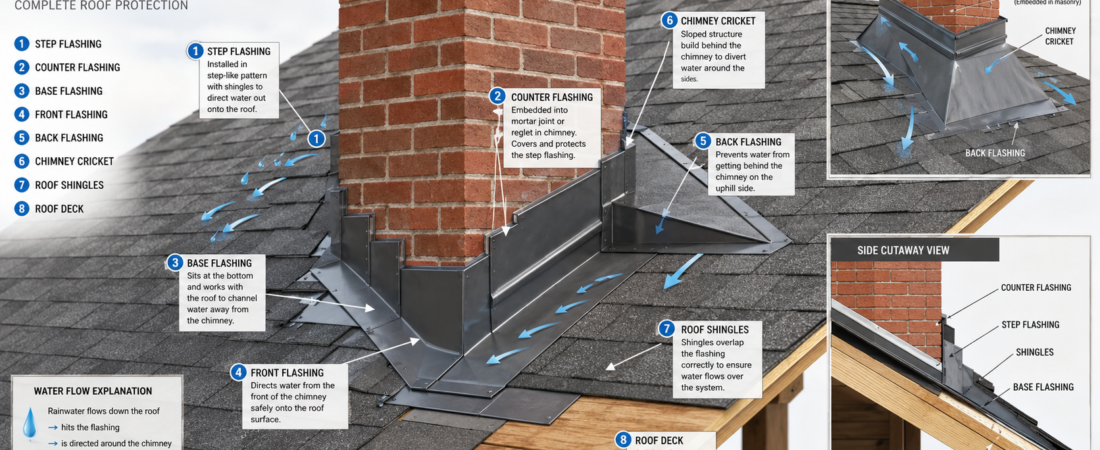
Proper Chimney Flashing Diagram is a waterproofing system installed around the base of a chimney where it intersects with the roof. It normally combines different types of flashing rather than relying on one large piece of metal. Step flashing protects the sides, base flashing works with the roofing system, counter flashing covers the upper edge of the flashing, and back flashing or a cricket handles water behind the chimney. Together, these components create layered protection that allows rain to move downhill without getting behind the roof covering.
Why a Chimney Needs Flashing
A chimney may look solid and almost completely waterproof, but the joint between masonry and roofing materials is another story. Roof shingles expand and contract, masonry can absorb moisture, and heavy rain can push water into small gaps. Without an effective flashing system, those movements can create openings where water enters. The damage may remain hidden for months, with stains, rotten roof decking, damaged insulation, mold growth, or deteriorated framing appearing only after the problem has become serious.
How to Read a Proper Chimney Flashing Diagram
A good diagram usually shows the chimney rising through the roof, shingles approaching its sides, metal flashing tucked beneath or between roofing layers, and counter flashing attached to the masonry. The most important thing to notice is the direction of water flow. Proper flashing is not simply a metal barrier around the chimney. It is a drainage system designed so water moves from the roof onto the flashing and then safely back onto the roof surface.
Main Parts of Chimney Flashing
The typical chimney flashing system includes base flashing, step flashing, counter flashing, front flashing, back flashing, and sometimes a cricket. Each component has a particular job, and they need to work together. A failure in one area can allow water behind another component, which is why simply adding caulk to a leaking chimney does not always solve the underlying problem.
Step Flashing
Step flashing is installed along the sides of a chimney in individual sections that overlap each other. Each piece is integrated with the surrounding shingles so that water travels over the metal and continues down the roof. The stepped arrangement is important because the roof and chimney are meeting at a vertical-to-sloped transition. Instead of trying to cover that entire joint with one piece of material, installers create a series of overlapping layers that follow the roof course.
Base Flashing
Base flashing sits at the lower junction between the chimney and the roof and works with the roofing material to direct water away from the masonry. Depending on the chimney design, this flashing can form part of the front flashing arrangement or work together with other pieces around the structure. Its position is critical because water reaching the lower portion of the chimney needs a clear path back onto the roof.
Counter Flashing
Counter flashing is installed against the chimney masonry above the base or step flashing. Its purpose is to cover the upper portion of the flashing and prevent water from entering behind it. On masonry chimneys, counter flashing is commonly integrated into a mortar joint or another appropriate masonry detail rather than simply being placed on the surface and sealed with a thick bead of caulk.
Front Flashing
The front of the chimney faces the direction from which roof water is generally approaching. This makes the lower chimney-to-roof connection particularly important. Front flashing helps collect water coming down the roof and directs it around the chimney. A properly formed front flashing detail should not create a pocket where water can sit, because standing water increases the chance of leakage and deterioration.
Back Flashing
The area behind a chimney deserves special attention because water can collect against the uphill side of the masonry. Back flashing provides a transition between the chimney and the roof covering, but larger chimneys may need something more substantial. This is where a chimney cricket becomes particularly useful.
What Is a Chimney Cricket?
A chimney cricket is a raised, sloped structure built on the uphill side of a chimney. It divides water and directs it toward the sides instead of allowing a large volume of water to accumulate against the chimney. Crickets are especially useful on wider chimneys because a flat roof area immediately behind a large masonry structure can become a natural collection point for rain, leaves, snow, and debris.
Chimney Cricket Flashing Diagram
When looking at a chimney cricket diagram from above, imagine a small peaked roof attached to the back of the chimney. The center ridge rises toward the chimney while the sloping surfaces send water toward both sides. Metal cricket flashing follows these slopes and connects with the surrounding roof flashing. This arrangement reduces the amount of water pressing directly against the back of the chimney.
How Water Should Flow Around a Chimney
The simplest way to understand flashing is to follow the rain. Water should come down the roof, encounter the flashing, travel around the chimney, and continue downhill without finding an opening underneath the metal. Every overlap should support that direction of movement. If an overlap faces the wrong way, has a large exposed gap, or depends entirely on deteriorating sealant, water may work its way underneath.
Proper Flashing and Roof Shingles
Roof shingles and flashing need to be installed as a coordinated system. Step flashing is normally layered with the shingles so each roofing course and flashing piece creates another drainage layer. The exact installation method depends on the roofing material, chimney construction, climate, and applicable building requirements. This is why a diagram is useful for understanding the concept, but it should not replace the manufacturer’s installation instructions or local building requirements.
Proper Chimney Flashing Dimensions
There is no single universal flashing dimension that applies to every chimney and roof. Required dimensions can depend on roofing material, roof pitch, chimney size, flashing material, weather exposure, and local codes. A reliable installation should follow the applicable building code and roofing or flashing manufacturer’s specifications rather than copying measurements from a generic internet diagram.
Common Chimney Flashing Materials
Chimney flashing can be made from materials such as galvanized steel, aluminum, copper, stainless steel, or other approved metals. Copper is popular on some higher-end roofing systems because of its durability and appearance, while galvanized steel is common because it is practical and widely available. Material compatibility matters, however, because certain metals can react with one another or with masonry and roofing materials.
Chimney Flashing and Roof Pitch
Roof pitch affects how quickly water moves toward the chimney and how flashing needs to be shaped. A steep roof sheds water quickly, while a low-slope roof can allow water to remain in contact with flashing for longer periods. The flashing design therefore needs to suit the roof rather than being treated as a one-size-fits-all component.
Chimney Flashing Installation Sequence
A typical installation begins with preparing the chimney and roof area, followed by installing the appropriate base and step flashing as the roofing progresses. Counter flashing is then integrated with the masonry so it overlaps and protects the underlying flashing. The back of the chimney receives the appropriate flashing arrangement, and a cricket may be installed where the chimney’s size or design calls for one. The exact sequence varies with the roof system and construction details.
Why Counter Flashing Should Not Be Ignored
One of the easiest mistakes to make is focusing on the visible flashing at roof level while overlooking the counter flashing at the chimney. The two pieces serve different purposes. The lower flashing handles water at the roof transition, while counter flashing protects the upper edge against water entering from the masonry side. A properly designed system needs both components to work together.
Chimney Flashing Sealant
Sealant has an important supporting role, but it should not be treated as the primary waterproofing system. Flashing should rely on correct overlaps, mechanical integration, proper bends, and appropriate installation details. Sealant can deteriorate because of sunlight, temperature changes, movement, and weather exposure. If a chimney leaks every time the sealant cracks, the underlying flashing design may need attention rather than another layer of caulk.
Signs of Failed Chimney Flashing
Common warning signs include water stains around the chimney, damp attic insulation, peeling paint or damaged drywall near the chimney, deteriorated mortar, rusted flashing, loose metal, cracked sealant, or recurring leaks after heavy rain. Sometimes the roof leak appears several feet away from the chimney, which can make diagnosis confusing. Water can travel along roof decking before becoming visible inside the house.
Common Chimney Flashing Mistakes
Poor installations often involve inadequate overlaps, incorrectly positioned step flashing, exposed flashing edges, missing counter flashing, poorly shaped corners, excessive reliance on caulk, or inadequate protection behind a wide chimney. Another mistake is installing flashing without properly integrating it with the existing shingles. Even good-quality metal can fail to protect the building when the installation does not provide a continuous drainage path.
Can You Repair Chimney Flashing Yourself?
A homeowner with roofing experience may be able to handle a small repair, but complete chimney flashing replacement is more complicated than it appears in a simple diagram. The work involves roof access, metal fabrication, shingle removal, masonry details, and water management. If the chimney is tall, the roof is steep, or there is significant structural or water damage, hiring a qualified roofing or chimney professional is the safer choice.
How to Inspect Chimney Flashing
A basic visual inspection can reveal obvious problems. From a safe location, look for lifted metal, rust, cracked sealant, gaps around the chimney, damaged shingles, and areas where debris is collecting. Inside the attic, check for darkened wood, damp insulation, staining, or signs of previous moisture. Never walk onto a roof simply to inspect flashing if you do not have the appropriate equipment and experience.
Chimney Flashing vs. Chimney Cap
Chimney flashing and a chimney cap solve different problems. Flashing protects the roof-to-chimney junction, while a chimney cap sits at the top of the chimney and helps keep rain, snow, debris, and animals out of the flue and chimney structure. A chimney can have a perfectly good cap and still leak through defective roof flashing, so the two should not be confused.
Why a Diagram Is Better Than a Simple Photo
A photograph can show what chimney flashing looks like, but a diagram can show what is happening underneath the visible surfaces. That distinction matters because much of the flashing system is layered beneath shingles or integrated into masonry joints. A properly labeled illustration can reveal where water travels, how the layers overlap, and why certain components are positioned where they are.
What a Good Chimney Flashing Diagram Should Label
For educational purposes, a useful diagram should identify the chimney masonry, roof deck, shingles, step flashing, base flashing, counter flashing, front flashing, back flashing, and cricket where applicable. Arrows showing the direction of water flow can make the illustration even clearer. A side cutaway and a top-down view are particularly helpful because they explain different parts of the same waterproofing system.
When a Chimney Cricket Is Especially Important
A cricket becomes more important as the chimney gets wider and creates a larger obstruction to roof drainage. Instead of allowing water to gather behind the chimney, the sloped cricket divides the flow and sends it toward the sides. In regions that receive significant rainfall or snowfall, this detail can be especially valuable because the back side of a large chimney can otherwise become a difficult drainage point.
How Snow and Ice Affect Chimney Flashing
Cold climates create additional challenges because snow can accumulate around the chimney and melt later. Repeated freezing and thawing can also affect masonry, mortar joints, sealants, and flashing connections. A well-designed flashing system should account for the local weather conditions rather than being selected solely on appearance.
Chimney Flashing Maintenance
Flashing does not require constant attention, but it benefits from periodic inspection. Keep leaves and debris from collecting around the chimney, watch for rust or corrosion, and inspect visible sealant for cracking or separation. After major storms, it is sensible to check the attic and ceiling areas around the chimney for signs of moisture. Catching a small flashing problem early can prevent a much larger roof repair later.
Why Proper Installation Matters More Than Caulk
It can be tempting to solve a chimney leak with a tube of roofing sealant. Sometimes that works as a temporary repair, but caulk cannot compensate for missing or incorrectly installed flashing. Water needs to be physically directed away from vulnerable joints. Good flashing provides that mechanical drainage path, while sealant should generally support the system rather than carry the entire waterproofing burden.
Choosing the Right Flashing Diagram for Your Chimney
Not every chimney has the same shape, roof position, or surrounding construction. A simple narrow chimney may require a relatively straightforward step-and-counter-flashing arrangement, while a broad chimney may need a cricket and more complex back flashing. Before using any diagram as an installation guide, compare it with the actual chimney and roof configuration.
Conclusion
A proper chimney flashing diagram is more than a collection of labels. It explains a drainage strategy that protects one of the most vulnerable points on a roof. Step flashing works with the shingles, base flashing manages the roof transition, counter flashing protects the upper edge, and a cricket can redirect water behind a wide chimney. Understanding how these pieces work together makes it much easier to recognize good workmanship and spot potential problems before they turn into expensive interior damage. For actual installation or replacement, however, use the diagram as an educational reference and follow applicable building codes, roofing-system instructions, and professional recommendations for the specific property.
FAQs About Proper Chimney Flashing Diagrams
1. What does a proper chimney flashing diagram show?
A proper diagram normally shows the chimney, roof shingles, step flashing, base flashing, counter flashing, front and back flashing, and, when appropriate, a chimney cricket. It should also make the intended direction of water flow clear.
2. What is the most important part of chimney flashing?
There is not one single part that can replace the others. The system works because step flashing, base flashing, counter flashing, and back flashing are correctly integrated. On wider chimneys, the cricket and its flashing can also be particularly important.
3. Does every chimney need a cricket?
No. The need for a cricket depends largely on the chimney’s width, roof configuration, drainage requirements, and applicable construction standards. Wider chimneys are more likely to benefit from a properly designed cricket behind them.
4. Can chimney flashing be installed without sealant?
Some flashing connections may require sealant as part of the installation, but the exact requirements depend on the materials and design. The important point is that sealant should not be used as a substitute for properly designed and mechanically integrated flashing.
5. Why does chimney flashing leak?
Leaks can result from damaged metal, poor overlaps, missing counter flashing, failed sealant, incorrect installation, masonry deterioration, or water collecting behind the chimney. In some cases, the visible leak appears away from the actual entry point because water travels beneath the roof surface.
Read also: 15 Inexpensive Stepping Stone Walkway Ideas That Look Great