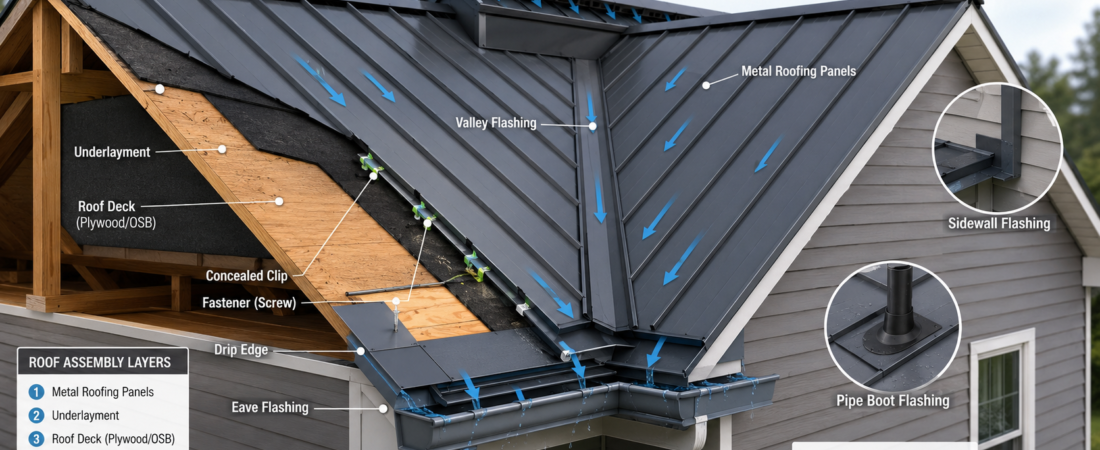
metal roof installation diagram, understand roofing layers, flashing, fasteners, panels, and key installation details. Instead of looking at a finished roof and wondering what is underneath the metal panels, a good diagram reveals the layers, connections, flashing, fasteners, and drainage details that work together to protect a home. Metal roofing may look simple from the outside, but proper installation involves much more than placing sheets of metal over a roof. The roof deck needs to be prepared, the correct underlayment must be considered, edges need proper flashing, panels have to be aligned correctly, and water must have a clear path away from the building. Whether you are a homeowner researching a replacement roof, a contractor explaining a project to a customer, or someone planning a DIY roofing job, understanding these components can help you recognize what a properly installed metal roof should look like.
What Is a Metal Roof Installation Diagram?
A metal roof installation diagram is a visual representation of how a metal roofing system is assembled and installed on a building. It typically illustrates the roof deck, underlayment, metal panels, fasteners or clips, flashing, ridge cap, eave details, valleys, and other components that may be required. The purpose is not simply to show where the metal goes. A useful diagram explains how the individual parts interact to create a weather-resistant roof assembly. It can also show the direction of water flow, panel overlaps, fastening locations, and transitions around roof penetrations. Because metal roofing systems vary considerably, the exact details shown in one diagram may not apply to another system. Standing seam roofing, exposed-fastener panels, metal shingles, and other profiles each have their own installation requirements.
Why Use a Metal Roofing Installation Diagram?
Roofing diagrams are useful because many of the most important parts of a roof cannot be seen once the project is finished. A homeowner might see metal panels, but underneath those panels are structural and weatherproofing components that play an important role. A diagram gives you a way to see the complete assembly before installation begins. It can help explain where underlayment belongs, how edge flashing works, where fasteners should be positioned, and how the ridge or valley should be finished. For contractors, diagrams can also serve as communication tools when discussing construction details with property owners or workers. Most importantly, they encourage attention to details that are easy to overlook. A roof rarely fails because the large metal sheet was missing; problems are more often associated with moisture, flashing, fasteners, penetrations, movement, or poor detailing.
Basic Layers Shown in a Metal Roof Diagram
A typical metal roofing diagram starts with the structural roof deck. This may be plywood, oriented strand board, or another approved decking material depending on the building and roofing system. Above the deck, the installation may include an underlayment or other moisture-control layer. The metal panels then form the exterior weathering surface, while flashing protects vulnerable transitions. Depending on the system, battens, purlins, clips, screws, insulation, or ventilation components may also appear in the diagram. Think of these layers as a team rather than separate pieces. The roof deck provides the base, the underlayment adds another layer of protection, the metal panels shed most precipitation, and flashing directs water around areas where a simple panel surface cannot provide adequate protection. Every layer has a job, and skipping or incorrectly installing one component can affect the performance of the entire system.
Roof Deck: The Foundation Beneath the Metal
The roof deck is the surface that supports the roofing assembly, so its condition matters before any metal panels are installed. A metal roof should not simply be installed over damaged, weakened, or unsuitable decking without addressing the underlying problem. A diagram usually places the roof deck beneath the other roofing components because it forms the structural base of the system. During preparation, installers may inspect the decking for moisture damage, rot, deterioration, uneven areas, or fastening problems. The precise requirements depend on the roofing product and local building regulations. A smooth and properly supported substrate can make panel installation more predictable, while damaged decking can create problems that remain hidden until much later.
Underlayment in a Metal Roof Installation Diagram
Underlayment is another important element commonly shown beneath metal roofing panels. Its purpose is to provide additional protection against moisture and weather that may get beneath the exterior roofing surface. The appropriate underlayment depends on the roof design, climate, roofing manufacturer, and applicable building requirements. Some systems use synthetic underlayment, while others may require specialized high-temperature or self-adhered products in particular locations. The key point is that the underlayment is part of the overall roofing system rather than an optional decorative layer. It should be installed according to the manufacturer’s instructions, especially around seams, penetrations, valleys, and edges where water management becomes more demanding.
Metal Roof Panels and Their Direction
The metal panels are the most visible part of the roofing system, but their installation requires careful planning. Depending on the profile, panels may run vertically from the eave toward the ridge or follow another configuration specified by the manufacturer. Panel alignment matters because small errors can become increasingly noticeable as installation progresses across a roof. Panels also need the correct side and end laps when overlaps are part of the system. A metal roof installation diagram may use arrows to show panel direction and water movement, which is particularly helpful when learning how the roof is supposed to shed rain. Installers also need to account for thermal movement, panel expansion and contraction, and the manufacturer’s recommended fastening method.
Fasteners and Clips
Fasteners are one of the most important details in a metal roofing diagram because they secure the roofing material to the structure. Exposed-fastener systems generally use roofing screws with appropriate washers, while standing seam systems may use concealed clips that allow the panels to move in response to temperature changes. The location, spacing, type, and installation method of fasteners depend on the specific roofing product and structural requirements. Overdriving a screw can damage the washer or deform the metal, while underdriving can compromise the connection. Using the wrong fastener can create corrosion or waterproofing problems. This is why a generic diagram should be treated as an educational reference rather than a substitute for the installation instructions supplied with the actual roofing system.
Eave and Drip Edge Detail
The eave is the lower edge of a sloped roof, and it plays an important role in directing water away from the building. A metal roof installation diagram may show an eave trim or drip-edge component beneath or alongside the panel edge. The exact arrangement varies between roofing systems, but the basic goal is consistent: control water and prevent it from getting behind vulnerable roof-edge components. The eave detail also has to work with gutters when gutters are installed. A poorly designed or incorrectly installed edge can allow water to reach the fascia, decking, or other parts of the building. This small section of the roof deserves as much attention as the large visible panels.
Ridge Cap and Roof Peak
At the top of a sloped roof, the metal panels meet at the ridge. A ridge cap covers this transition and helps protect the roof from wind-driven rain. Many systems also incorporate ventilation at the ridge, using a compatible ridge vent and closure arrangement where appropriate. A diagram may show the ridge cap overlapping or connecting with the metal panels while leaving a controlled ventilation path beneath it. The exact construction depends on the roofing profile and whether the roof uses vented or non-vented construction. Proper ridge detailing is important because the roof peak is exposed to weather from multiple directions and requires a carefully designed transition.
Metal Roof Valley Installation
A valley occurs where two sloping roof sections meet and concentrate rainwater into a common drainage path. Because water volume increases in this area, valley construction deserves special attention. A metal roof installation diagram may show valley flashing beneath or integrated with the surrounding panels, along with specific clearances and overlap details. The correct arrangement varies greatly between metal roofing products. Some systems use open valleys, while others use different panel and trim configurations. The important principle is that the valley must provide a reliable route for water without creating areas where debris, ice, or water can become trapped. Installers should follow the roofing manufacturer’s valley instructions rather than copying details from an unrelated roofing system.
Flashing Around Walls, Chimneys, and Vents
Flashing protects places where the roof meets another structure or where something passes through the roofing surface. Chimneys, skylights, plumbing vents, walls, and roof-to-wall intersections all require specialized detailing. A diagram can make these areas easier to understand because it shows how metal trim, flashing, and roofing layers overlap. The goal is to prevent water from entering vulnerable joints while allowing the roof and adjacent materials to perform as intended. Chimney flashing, for example, may involve several components rather than one piece of metal. Roof-to-wall flashing can also require carefully planned overlaps so water is directed downward rather than behind the siding or roofing materials.
How Water Moves Across a Metal Roof
One of the easiest ways to understand a roofing diagram is to follow the water. Imagine rain landing near the ridge. It should travel downward across the metal panel toward the eave, where the roof-edge detail directs it away from the building or into a gutter. When the water reaches a valley, flashing should guide it safely toward the lower edge. When it encounters a chimney or wall, properly designed flashing should redirect it around the obstruction. This simple mental exercise explains why overlaps, seams, penetrations, and flashing details matter so much. A good roofing system does not merely keep rain off the roof; it manages the water’s entire journey from the upper surface to the ground.
Standing Seam vs. Exposed-Fastener Metal Roofing
Not every metal roof installation diagram looks the same because different roofing systems use different construction methods. Standing seam metal roofing commonly features vertical panels with raised seams and concealed clips or fasteners. This design can provide a clean appearance and allows certain systems to accommodate thermal movement. Exposed-fastener metal roofing, on the other hand, uses screws that remain visible on the exterior surface. It is often associated with simpler panel profiles and can be used in many residential, agricultural, and utility applications. Neither diagram should automatically be applied to the other system. Panel dimensions, fastening methods, seams, trims, and movement allowances can all differ.
Common Mistakes a Metal Roof Diagram Can Help Prevent
A good diagram can highlight mistakes before they happen. Common problems include incorrect panel alignment, missing flashing, poorly installed fasteners, inadequate edge detailing, improper overlaps, and blocking or incorrectly detailing ventilation. Another issue is using generic installation instructions for a product that requires a different method. Metal roofing is not one universal material; profiles and manufacturers can have very different requirements. A diagram is therefore most useful when paired with the manufacturer’s installation manual. When those two sources agree, the installer has a much clearer picture of how the roof should be assembled. When they differ, the product-specific instructions should take priority.
Can You Install a Metal Roof Yourself?
Some homeowners with construction experience may be capable of handling portions of a metal roofing project, but the difficulty should not be underestimated. Roofing involves working at height, handling large panels, accurately measuring and cutting metal, installing flashing, and understanding structural and weatherproofing requirements. A diagram can help someone understand the construction, but it does not eliminate the need for appropriate tools, safety procedures, product instructions, and knowledge of local requirements. A small mistake around a flashing transition can create a leak that is not discovered until the next major storm. For complex roofs, steep slopes, complicated penetrations, or unfamiliar roofing systems, professional installation can be the safer and more reliable option.
How to Read a Metal Roof Installation Diagram
Start by identifying the roof deck at the bottom of the cross-section and then work upward through each layer. Look for the underlayment, panels, fasteners or clips, edge trims, and flashing. Next, follow the arrows or panel orientation to understand how water is expected to move. Pay special attention to locations where two materials meet because these transitions often contain the most important details. Finally, compare the diagram with the manufacturer’s actual installation instructions. If a diagram shows a component that your roofing product does not use, do not assume it should be added. The purpose of a diagram is to explain a system, not to create a universal recipe for every metal roof.
Metal Roof Installation Diagram for Homeowners
For homeowners, the biggest benefit of understanding a metal roofing diagram is knowing what questions to ask. You can ask whether the existing decking is suitable, what underlayment will be used, how the eaves and ridge will be finished, and how roof penetrations will be flashed. You can also ask which fastening system the contractor is using and whether the installation follows the roofing manufacturer’s specifications. These questions do not require you to become a roofing professional. They simply help you understand what is being installed above your home. A clear explanation from the contractor should make sense when compared with the basic components shown in the diagram.
Metal Roof Installation Diagram and Building Codes
A diagram can explain construction principles, but it cannot replace local building codes or engineering requirements. Roofing projects may be affected by wind loads, snow loads, roof slope, fire classifications, energy requirements, structural conditions, and other factors. Local rules can also determine requirements for fasteners, flashing, underlayment, ventilation, and roof replacement. Because these requirements vary by location, anyone planning a roofing project should check the applicable local regulations and the manufacturer’s approved installation method. When a project involves structural changes or unusual conditions, professional advice may be appropriate.
Maintenance After Metal Roof Installation
A properly installed metal roof still benefits from periodic inspection and maintenance. Homeowners can watch for damaged panels, loose or deteriorated fasteners, blocked drainage paths, damaged flashing, debris accumulation, and problems around roof penetrations. Gutters should also be kept clear so water can leave the roof efficiently. Walking directly on metal roofing can be inappropriate for some profiles and may cause damage, so maintenance should follow the manufacturer’s recommendations. If a leak appears, finding the visible wet spot inside the building does not necessarily identify the actual source. Water can travel beneath roofing materials before entering the interior, which is why professional inspection may be necessary for persistent leaks.
Conclusion
A metal roof installation diagram is more than a simple picture of roofing panels. It provides a visual explanation of how the roof deck, underlayment, panels, fasteners, flashing, valleys, eaves, ridge, and drainage details work together. Once you understand the basic structure, a complicated roofing project becomes much easier to visualize. The most important lesson is that metal roofing performance depends on the entire system, not just the quality of the visible panels. Correct flashing, fastening, water management, and manufacturer-approved installation details all matter. If you are researching a new roof, use diagrams to understand the terminology and ask better questions, but always rely on the specific product instructions and applicable building requirements for the actual installation.
Frequently Asked Questions
What does a metal roof installation diagram show?
A metal roof installation diagram shows how the major components of a metal roofing system fit together. Depending on the system, it may include the roof deck, underlayment, metal panels, fasteners or clips, flashing, eave trim, ridge cap, valleys, ventilation components, and roof penetrations.
What goes underneath a metal roof?
The materials beneath a metal roof depend on the roofing system and building design, but the assembly commonly includes a structural roof deck and an appropriate underlayment. Some installations may also use purlins, battens, insulation, or other components. The manufacturer’s specifications should determine the correct assembly.
Do metal roof panels need an underlayment?
Many metal roofing installations use underlayment as part of the roofing assembly, but the exact product and installation method depend on the roof design, climate, code requirements, and manufacturer. Always follow the approved installation instructions for the specific metal roofing system.
How are metal roof panels attached?
Metal roof panels may be attached using exposed roofing screws or concealed clips, depending on the panel type. Fastener type, spacing, placement, and installation technique vary between products, so installers should follow the manufacturer’s specifications rather than relying on a generic diagram.
What is the purpose of flashing on a metal roof?
Flashing helps control water around vulnerable transitions such as roof edges, valleys, walls, chimneys, skylights, and vents. It redirects water away from joints and openings where the metal panels alone cannot provide adequate protection.